> ## Documentation Index
> Fetch the complete documentation index at: https://docs.whappy.ai/llms.txt
> Use this file to discover all available pages before exploring further.
# Zapier
> Connect Whappy with 6,000+ apps to automate your lead workflow. Send qualified leads to your CRM or receive new leads from forms and ads.
Connect Whappy with over 6,000 apps through Zapier to automate your lead workflow. Send qualified leads to your CRM automatically, or receive new leads from forms and ads to start WhatsApp conversations.
## How It Works
**Whappy → Other Apps**: When leads complete conversations or book appointments, automatically send their information to CRM, email tools, calendars, etc.
**Other Apps → Whappy**: When you get new leads from forms, ads, or other sources, automatically add them to Whappy to start WhatsApp conversations.
***
## Setting Up Actions (Receive Leads In)
Use actions to automatically add new leads to Whappy from your other business tools and start WhatsApp conversations.
### Step-by-Step Setup
1. Create a new Zap in Zapier
2. Choose your lead source as the trigger (Typeform, Facebook Lead Ads, Google Sheets, etc.)
3. Connect your account and configure the trigger
4. Test the trigger to ensure it's working properly
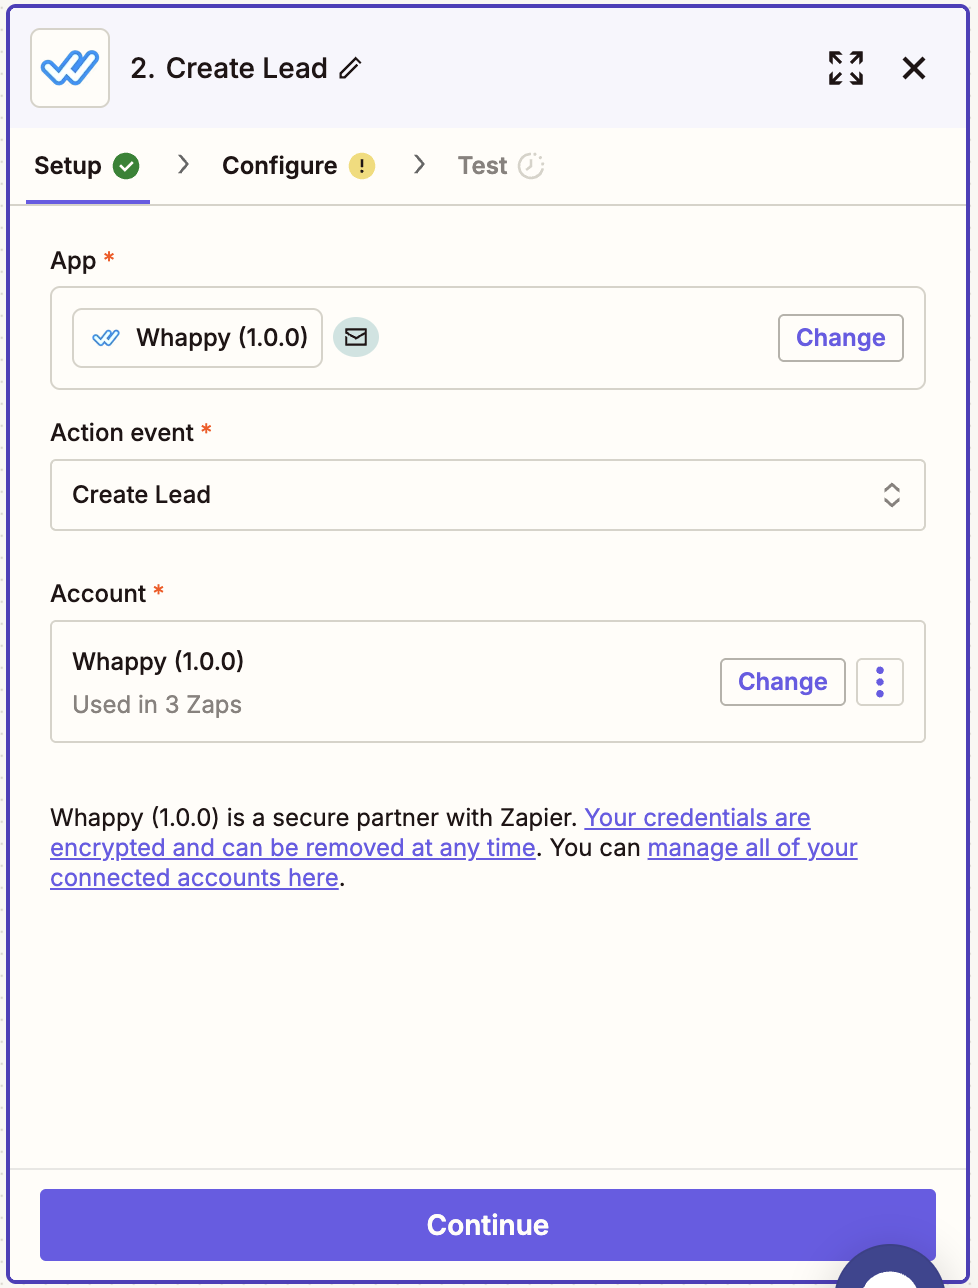
1. In the action section, search for **"Whappy"**
2. Select **Whappy** from the app results
3. Choose **Create Lead** as the action event
4. Click **Continue**
1. Click **Sign in to Whappy**
2. Copy your API key from **Integrations → Zapier** in your Whappy dashboard
3. Paste the API key in Zapier
4. Add an Account Label (add your account name to recognize if you have multiple account connected)
5. Click **Yes, Continue to Whappy**
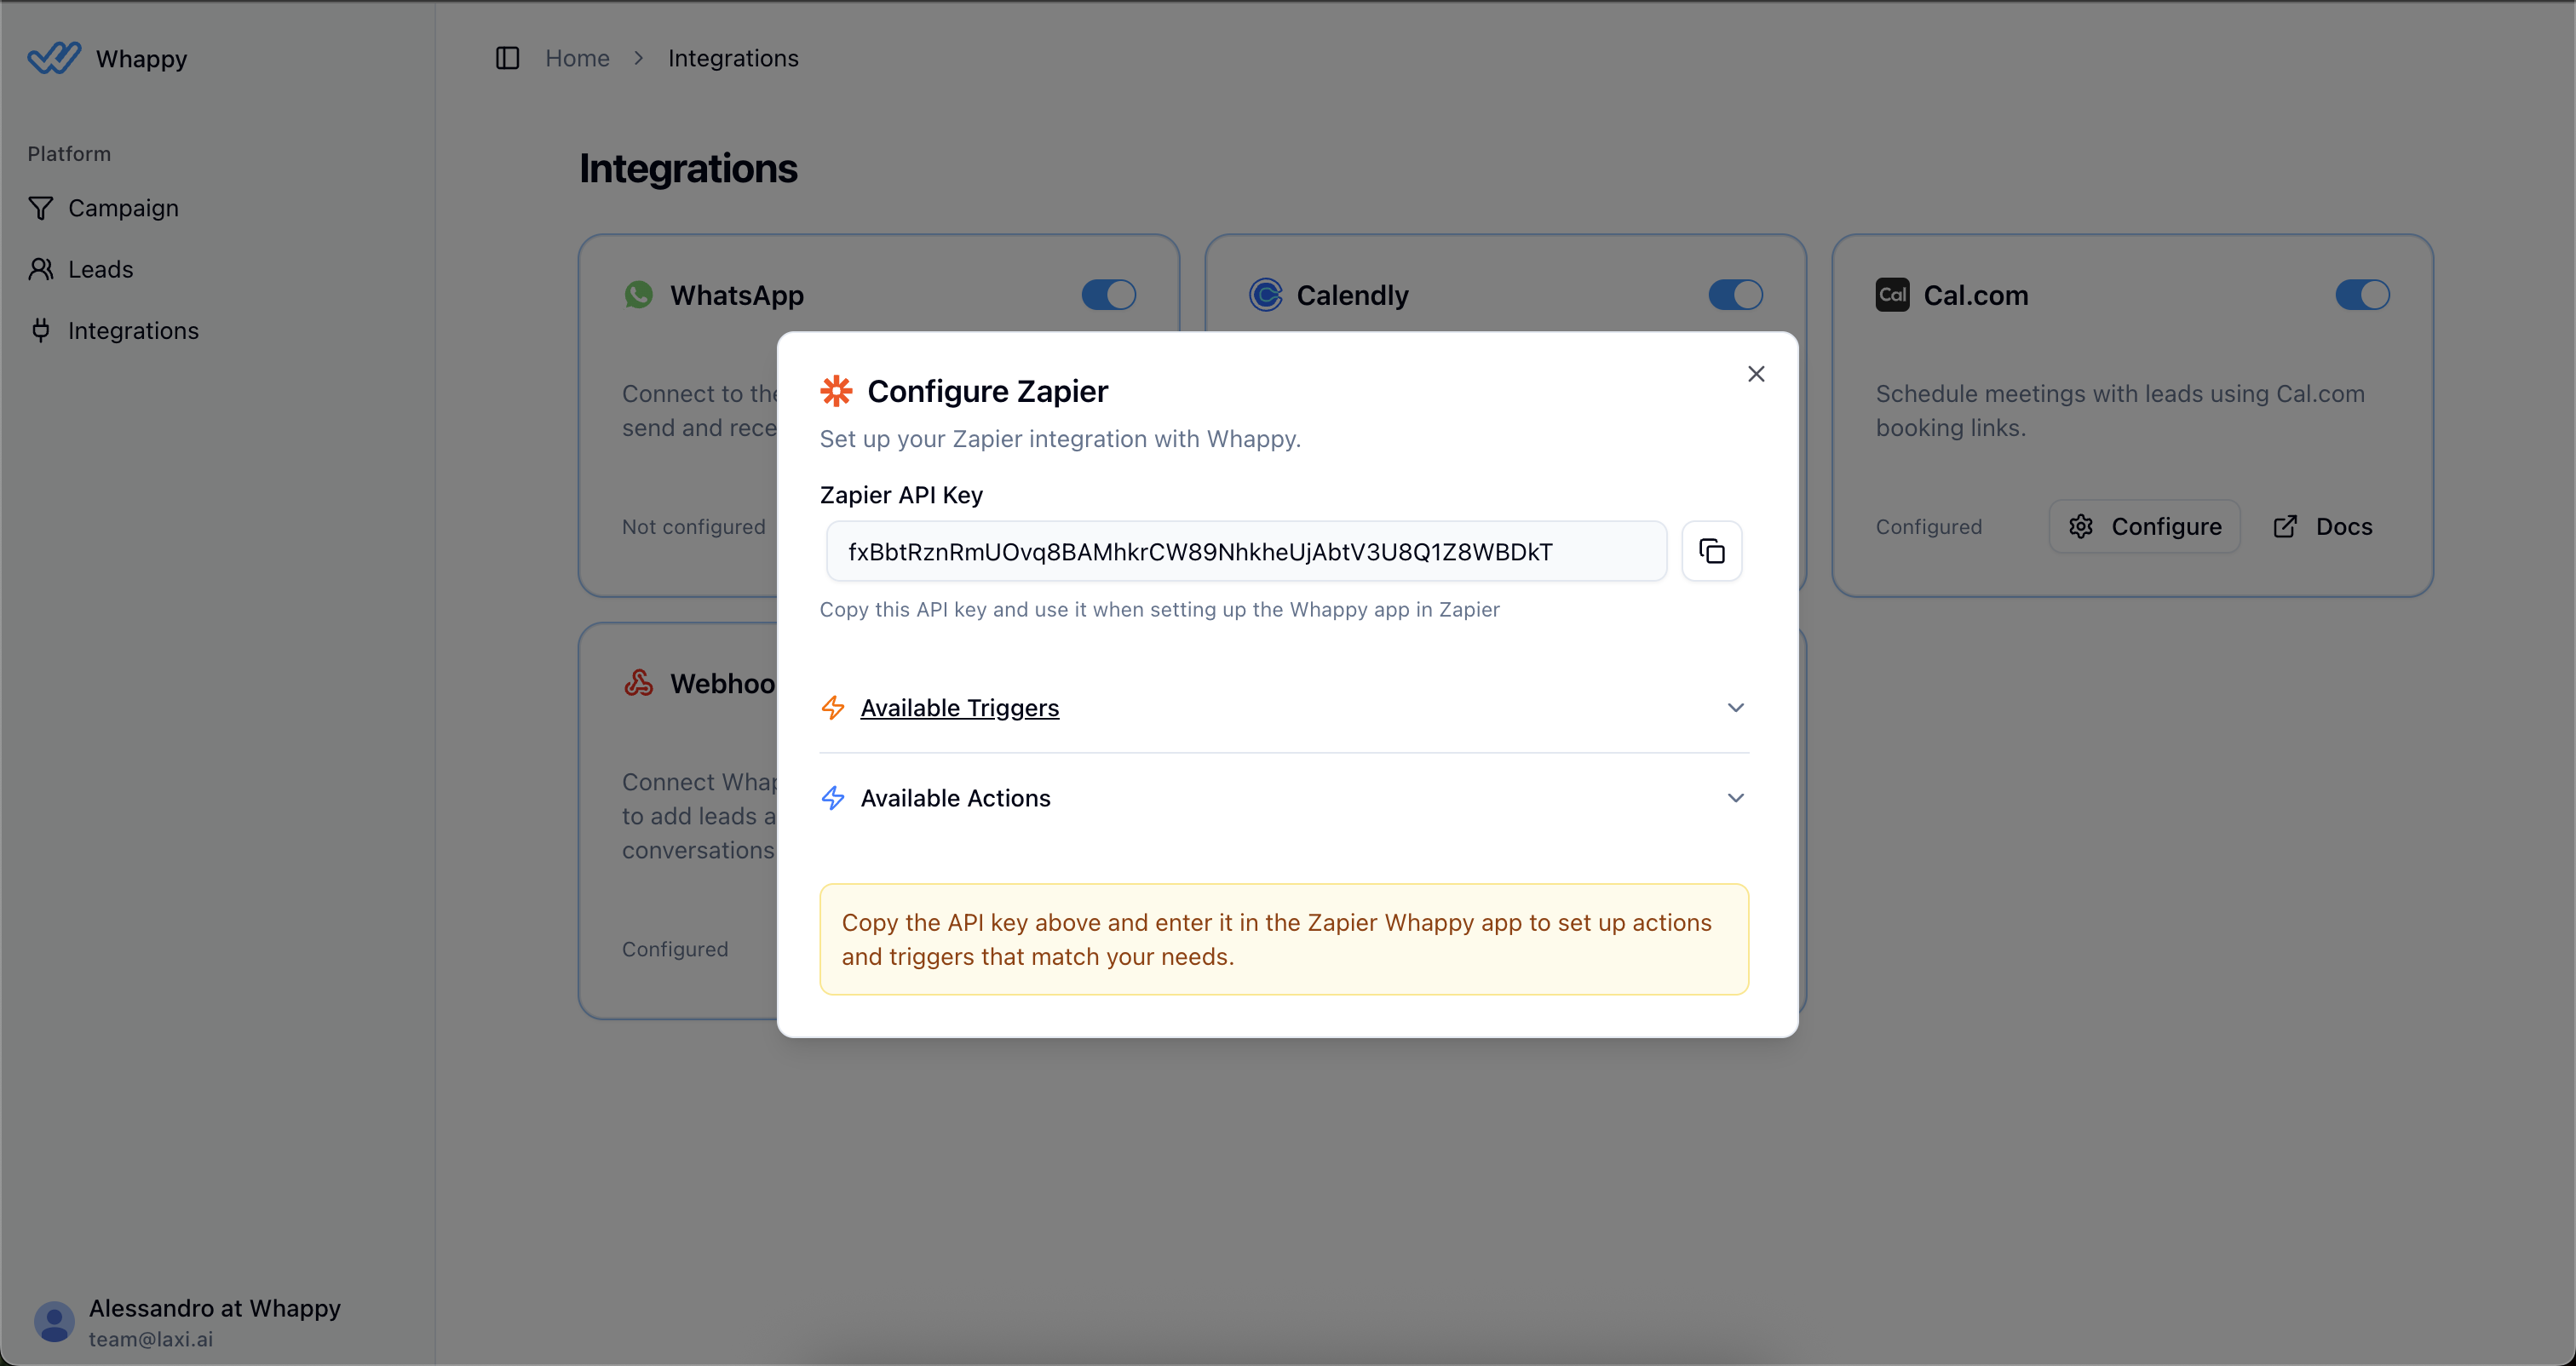
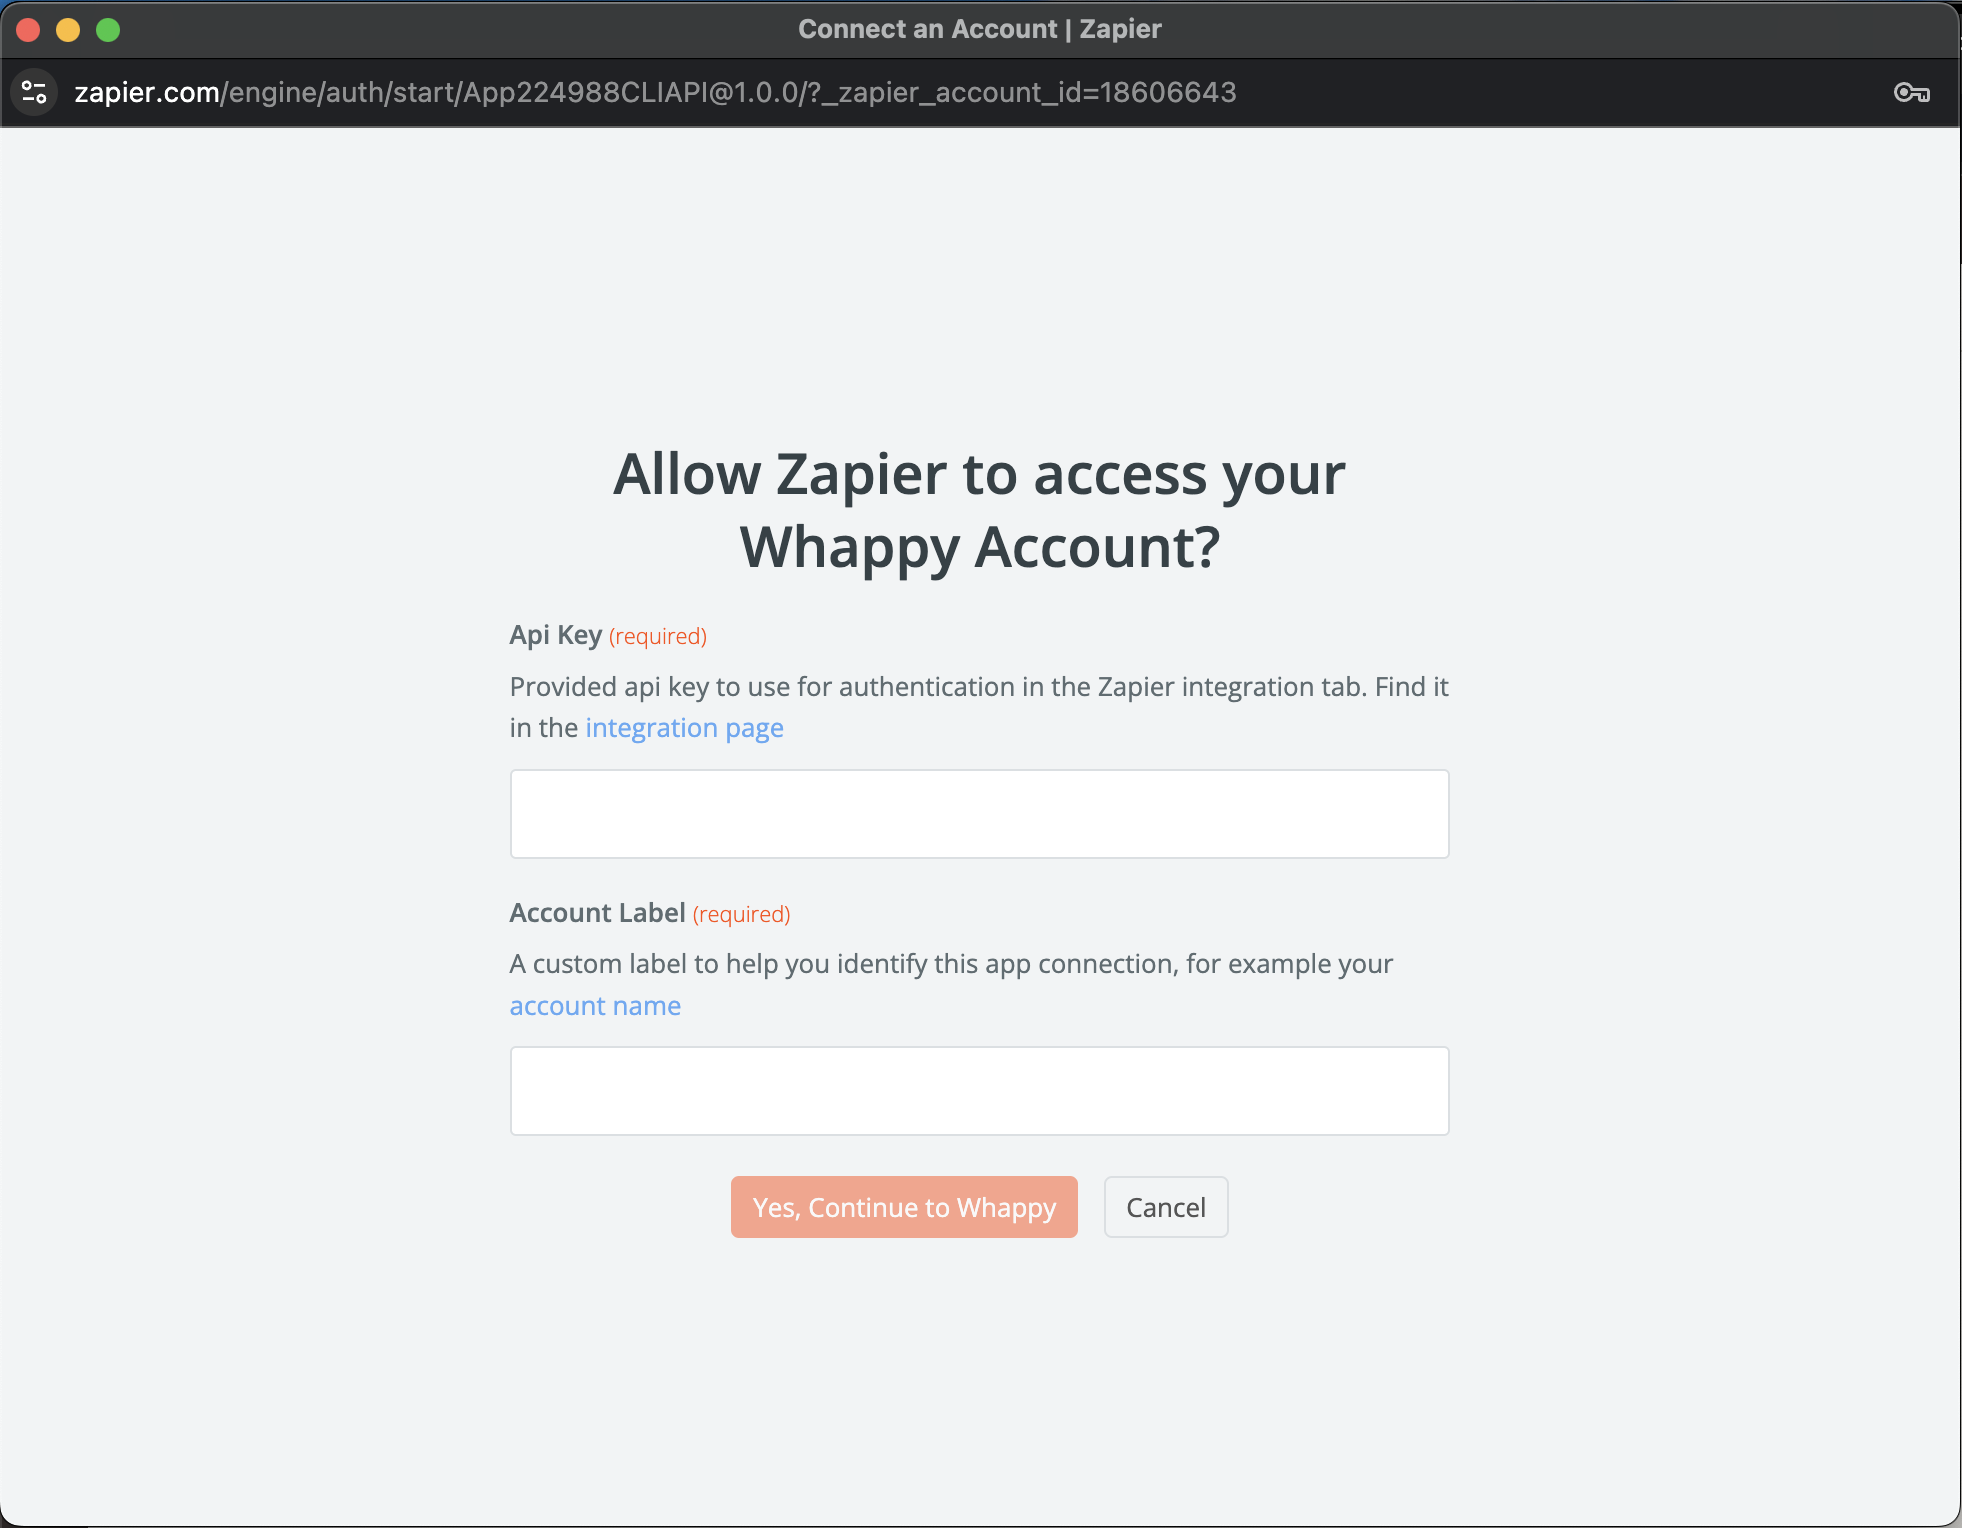 Use the same API key you used for triggers. You only need to connect your account once.
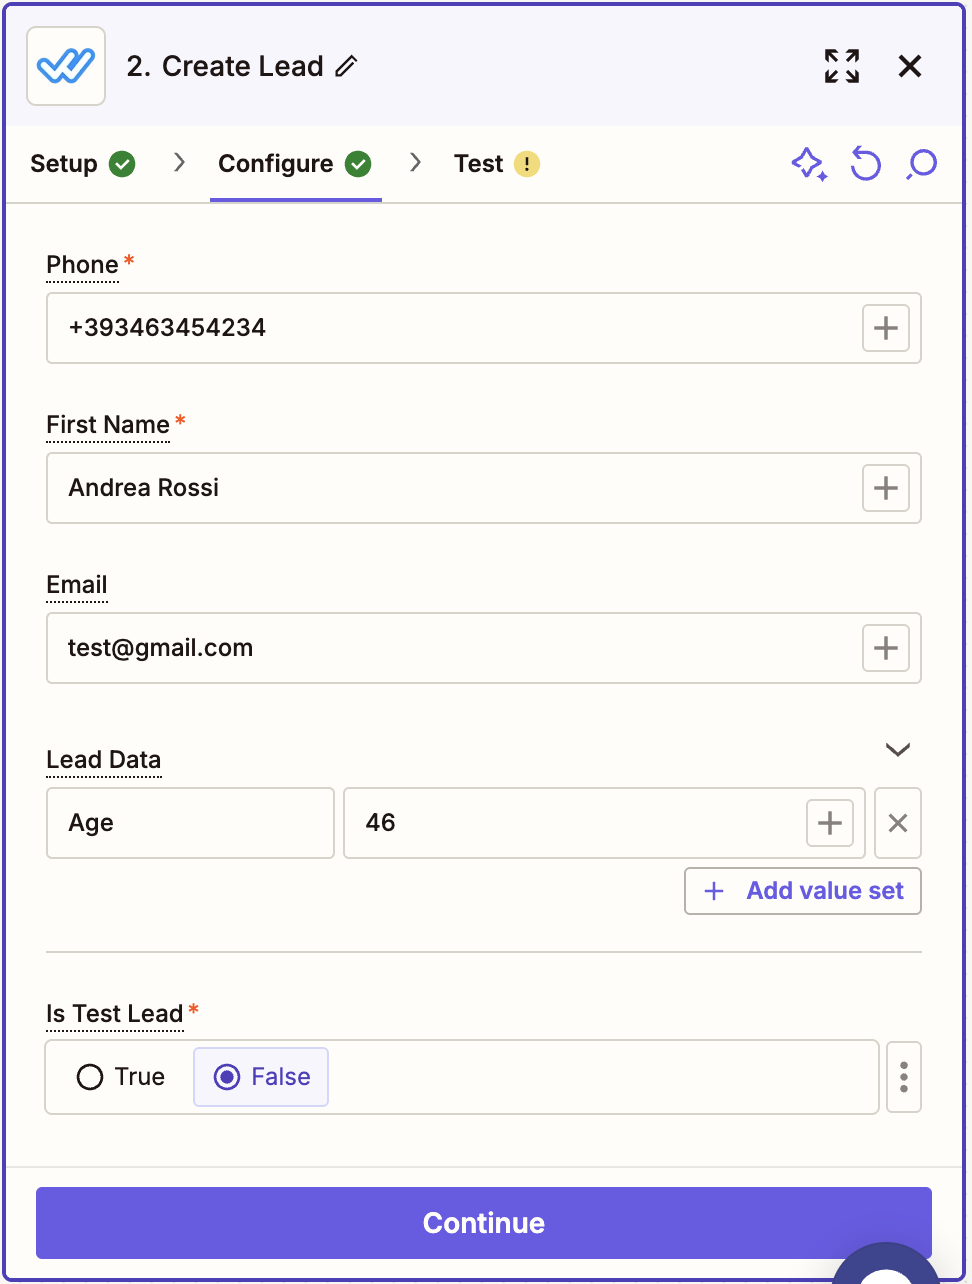
Map the fields from your trigger app to Whappy. Here are the available fields:
**Required Fields:**
* **Phone** *(must include country code, e.g., +1234567890)*
* **First Name**
**Optional Fields:**
* **Email**
* **Lead Data** *(JSON format for custom information)*
* **Is Test Lead** *(choose "No" for real leads, "Yes" for testing)*
Phone numbers must include the country code (e.g., +1 for US) to work with WhatsApp.
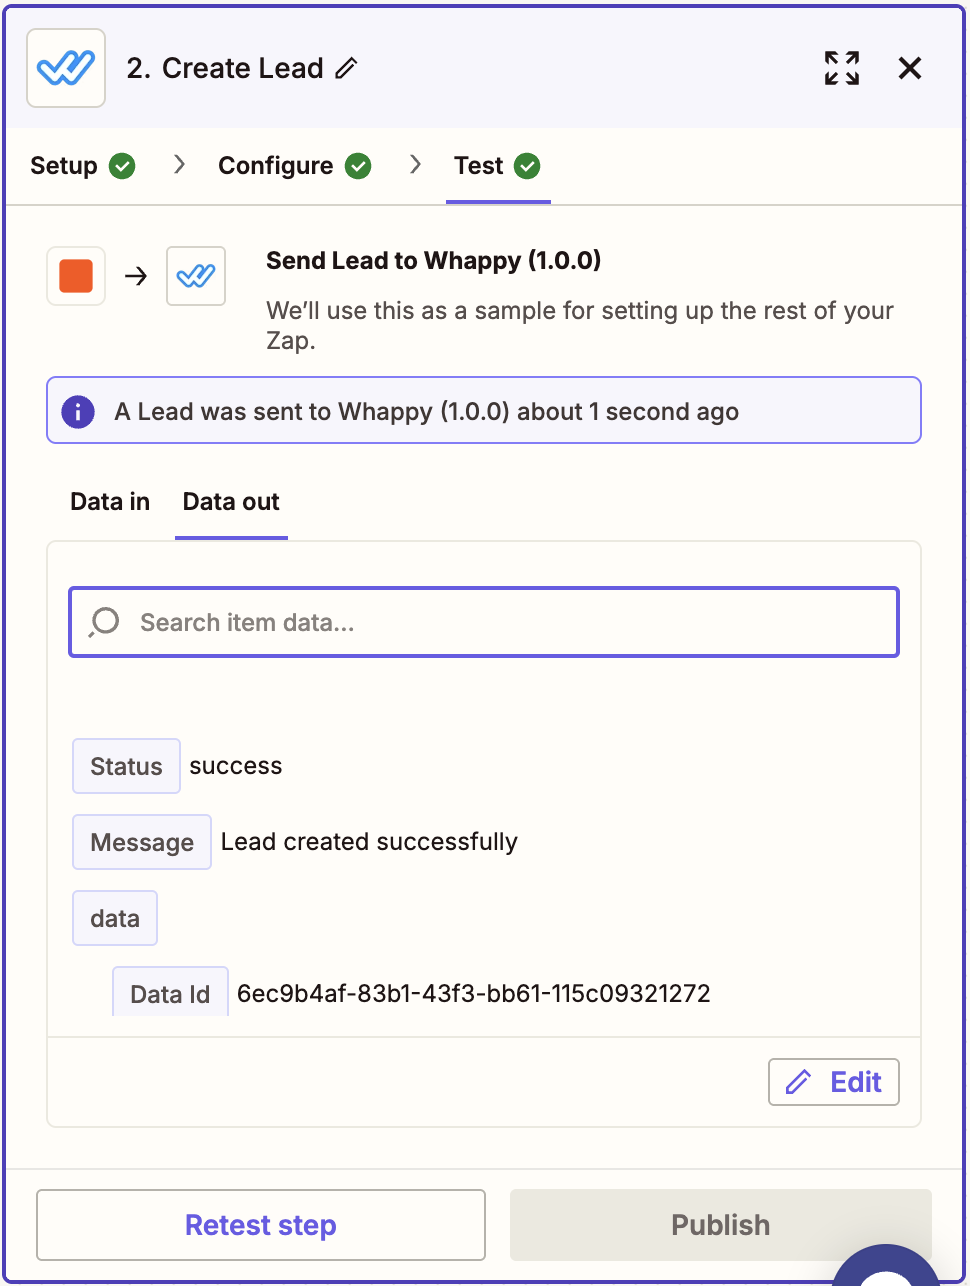
1. Click **Test action** to send a sample lead to Whappy
2. Check your Whappy dashboard under **Leads** to confirm the lead was created
3. If the test succeeds, turn on your Zap to start receiving leads automatically
### Popular Action Use Cases
**Setup**:
* **Trigger**: New Typeform/Gravity Forms submission
* **Action**: Create Lead in Whappy
**Benefits**:
* Instant WhatsApp follow-up for form submissions
* Higher response rates than email
* Automated qualification process starts immediately
**Setup**:
* **Trigger**: New Facebook Lead Ad submission
* **Action**: Create Lead in Whappy
**Benefits**:
* Qualify ad leads immediately via WhatsApp
* Reduce cost per qualified lead
* Filter out unqualified prospects early
**Setup**:
* **Trigger**: New/Updated contact in CRM
* **Action**: Create Lead in Whappy
**Benefits**:
* Re-engage cold leads with WhatsApp
* Follow up on sales opportunities
* Nurture prospects with conversational AI
***
## Setting Up Triggers (Send Leads Out)
Use triggers to automatically send qualified lead data from Whappy to your other business tools when conversations complete or appointments are booked.
### Available Triggers
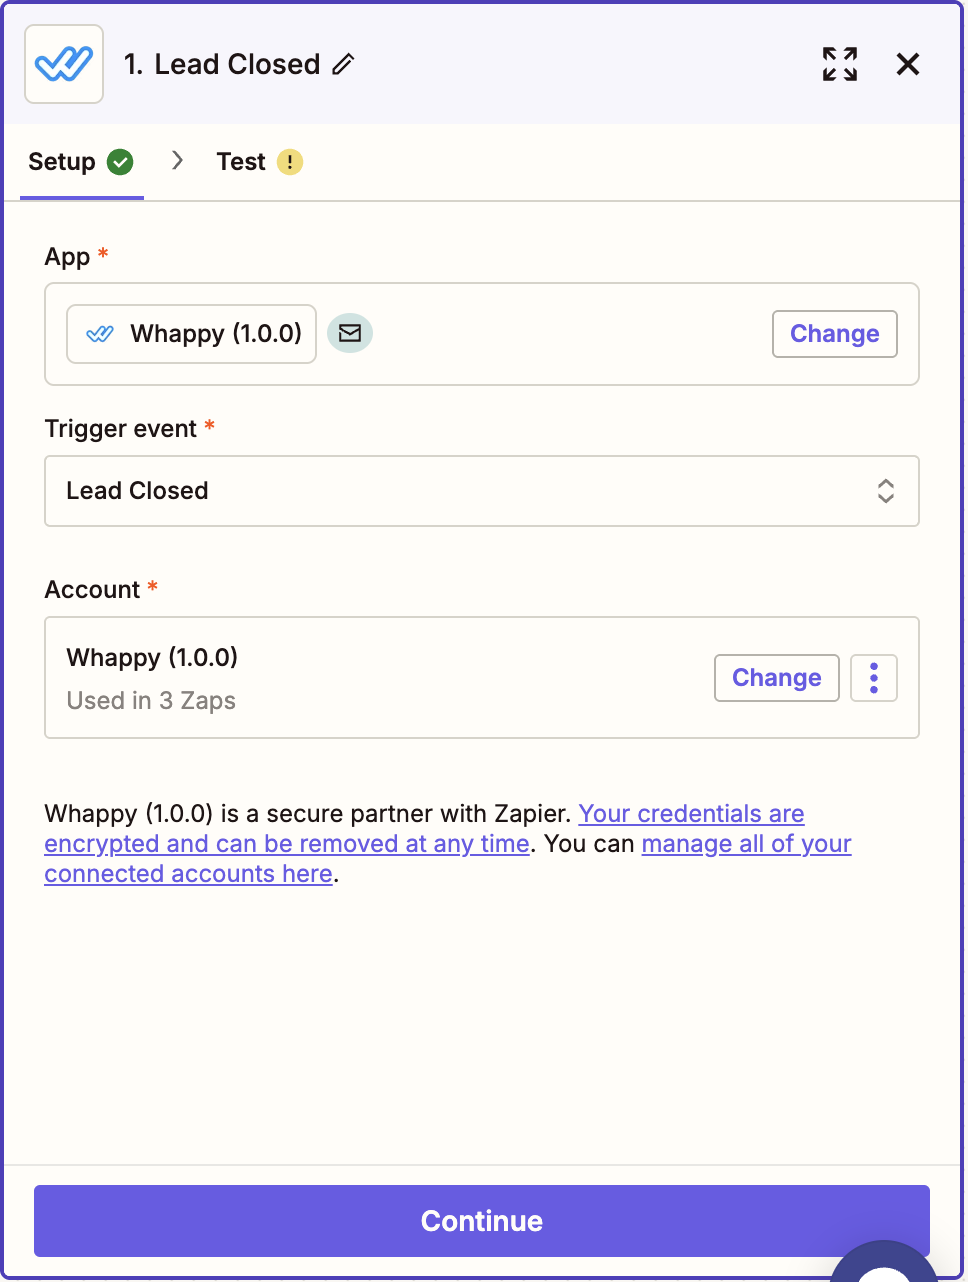
* **Lead Closed**: Fires when a lead successfully completes your conversation funnel
* **Appointment Scheduled**: Fires when a lead books an appointment through your conversation
### Step-by-Step Setup
1. Go to [zapier.com](https://zapier.com) and click **Create Zap**
2. In the trigger section, search for **"Whappy"**
3. Select **Whappy** from the app results
Use the same API key you used for triggers. You only need to connect your account once.
Map the fields from your trigger app to Whappy. Here are the available fields:
**Required Fields:**
* **Phone** *(must include country code, e.g., +1234567890)*
* **First Name**
**Optional Fields:**
* **Email**
* **Lead Data** *(JSON format for custom information)*
* **Is Test Lead** *(choose "No" for real leads, "Yes" for testing)*
Phone numbers must include the country code (e.g., +1 for US) to work with WhatsApp.
1. Click **Test action** to send a sample lead to Whappy
2. Check your Whappy dashboard under **Leads** to confirm the lead was created
3. If the test succeeds, turn on your Zap to start receiving leads automatically
### Popular Action Use Cases
**Setup**:
* **Trigger**: New Typeform/Gravity Forms submission
* **Action**: Create Lead in Whappy
**Benefits**:
* Instant WhatsApp follow-up for form submissions
* Higher response rates than email
* Automated qualification process starts immediately
**Setup**:
* **Trigger**: New Facebook Lead Ad submission
* **Action**: Create Lead in Whappy
**Benefits**:
* Qualify ad leads immediately via WhatsApp
* Reduce cost per qualified lead
* Filter out unqualified prospects early
**Setup**:
* **Trigger**: New/Updated contact in CRM
* **Action**: Create Lead in Whappy
**Benefits**:
* Re-engage cold leads with WhatsApp
* Follow up on sales opportunities
* Nurture prospects with conversational AI
***
## Setting Up Triggers (Send Leads Out)
Use triggers to automatically send qualified lead data from Whappy to your other business tools when conversations complete or appointments are booked.
### Available Triggers
* **Lead Closed**: Fires when a lead successfully completes your conversation funnel
* **Appointment Scheduled**: Fires when a lead books an appointment through your conversation
### Step-by-Step Setup
1. Go to [zapier.com](https://zapier.com) and click **Create Zap**
2. In the trigger section, search for **"Whappy"**
3. Select **Whappy** from the app results
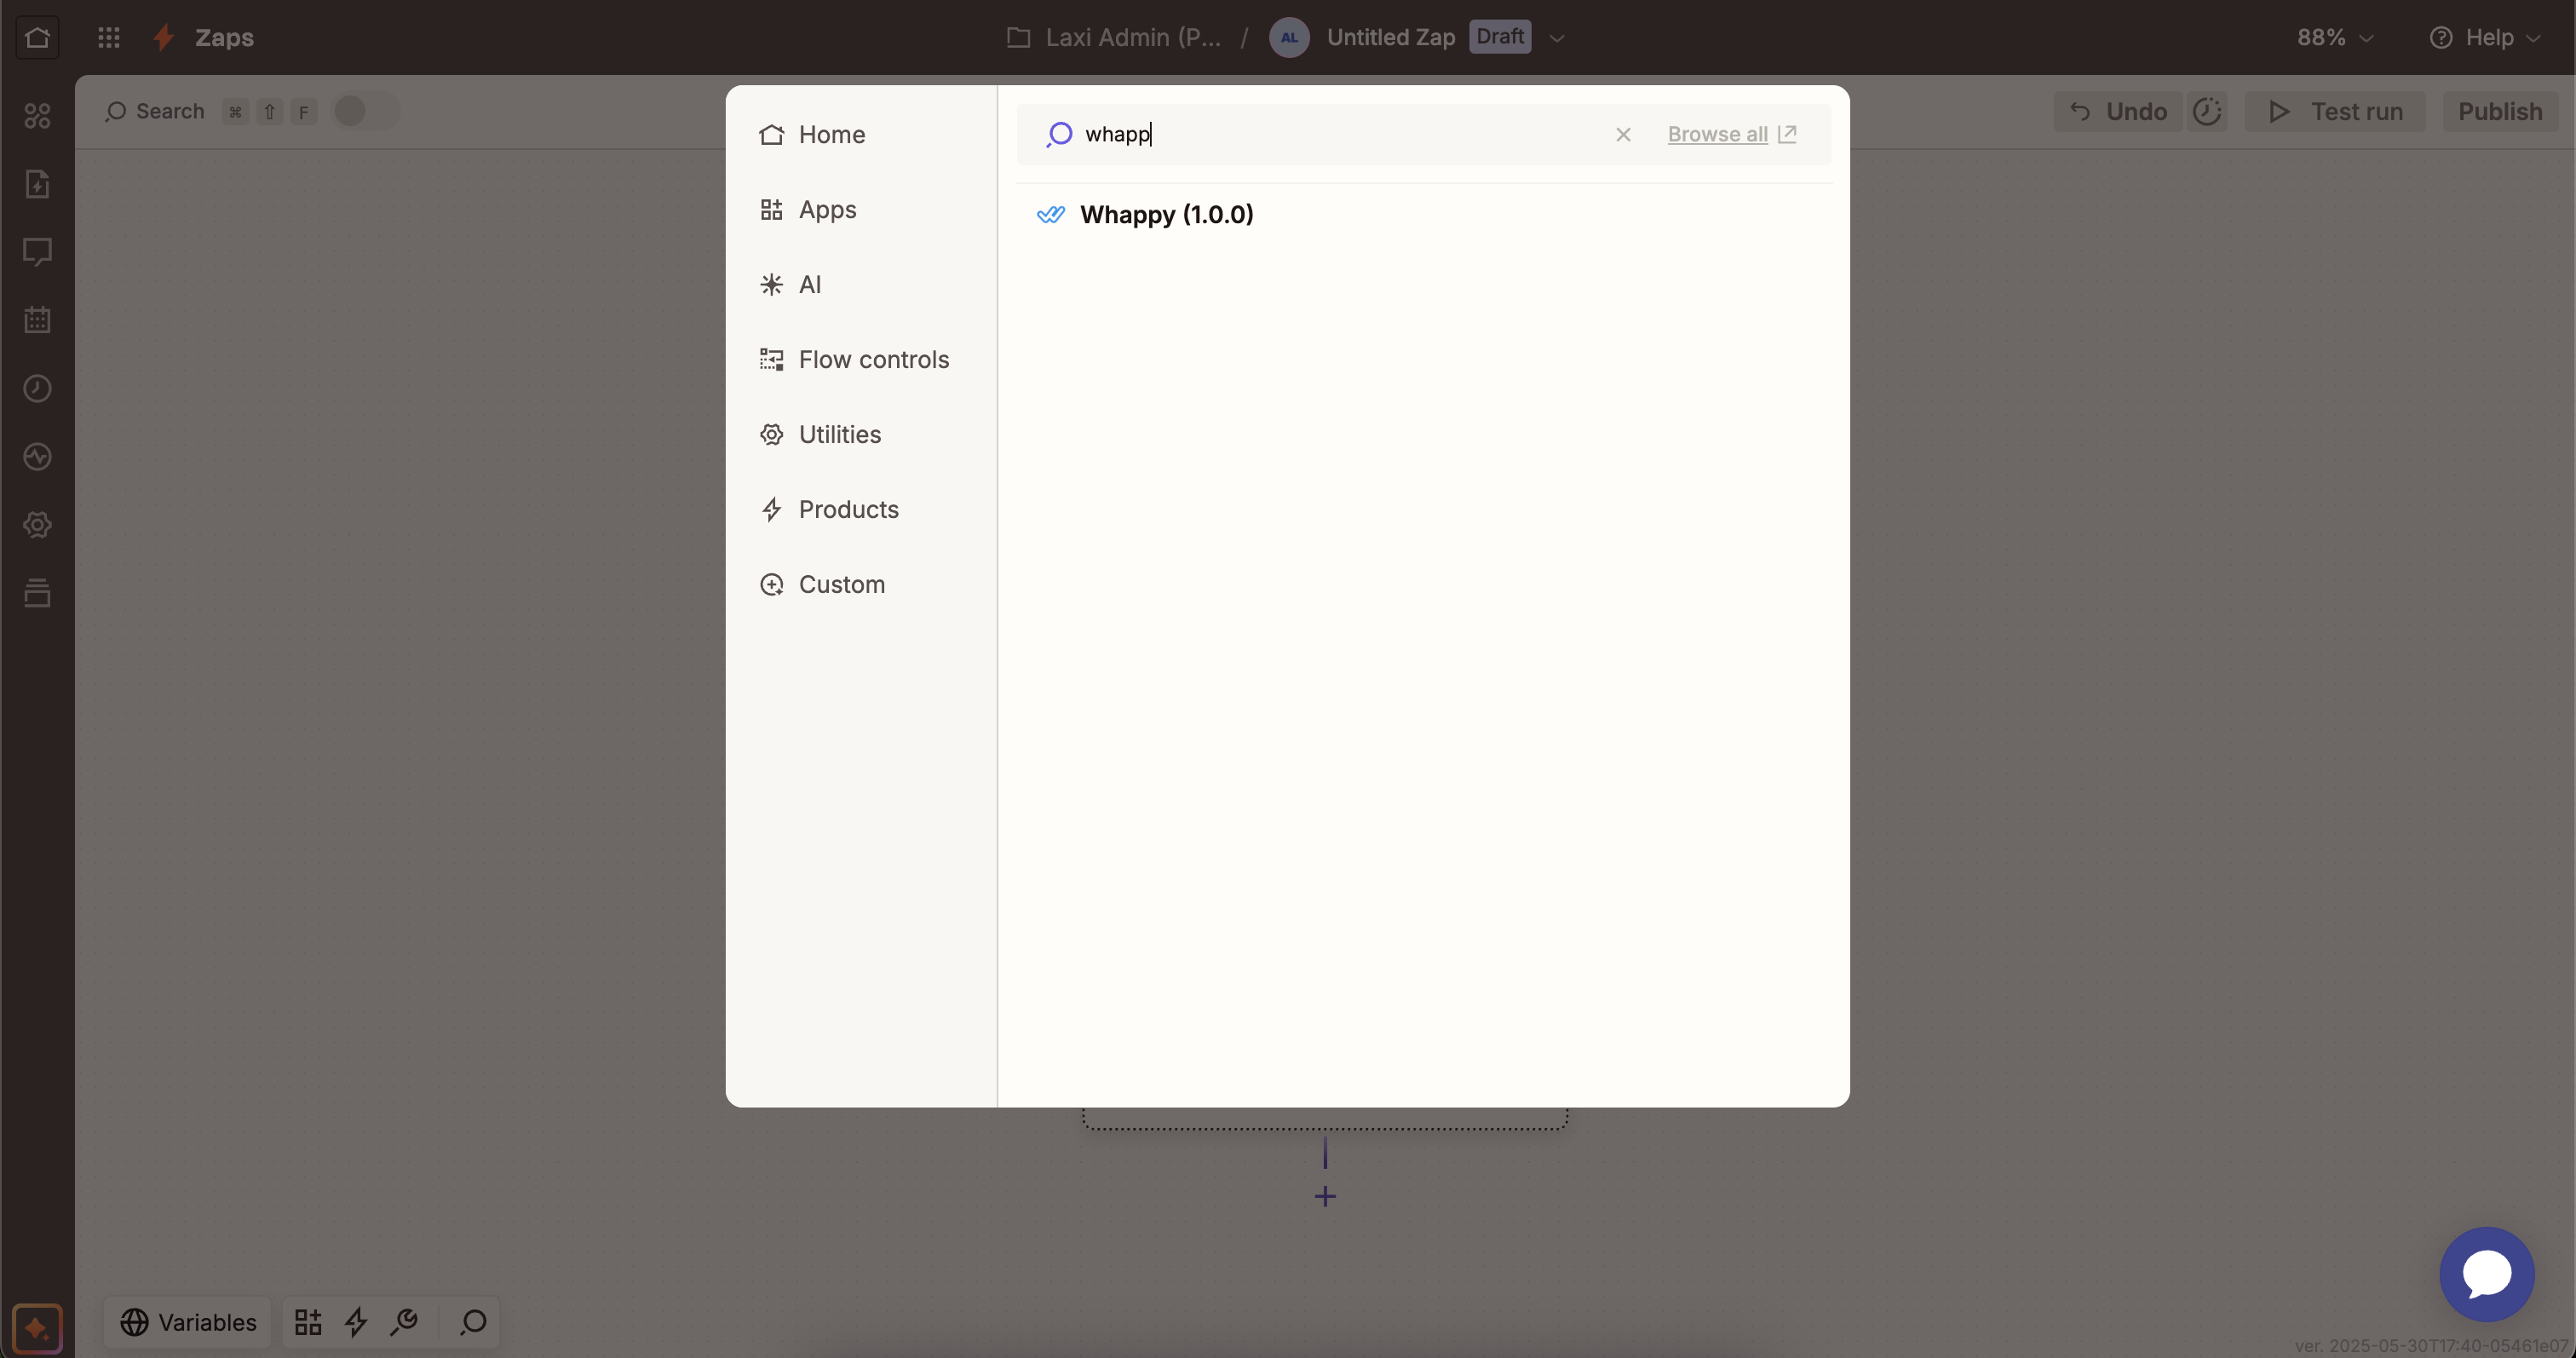 Choose the trigger that matches your workflow:
* **Lead Closed**: Use this to send completed/qualified leads to your CRM or email marketing tools
* **Appointment Scheduled**: Use this to create calendar events or send confirmation emails
1. Click **Sign in to Whappy**
2. In your Whappy dashboard, navigate to **Integrations → Zapier**
3. Copy your API key from the Zapier integration card
4. Return to Zapier and paste the API key in the connection form
5. Click **Yes, Continue to Whappy**
Click **Continue**.
Your API key is unique to your account. Keep it secure and don't share it publicly.
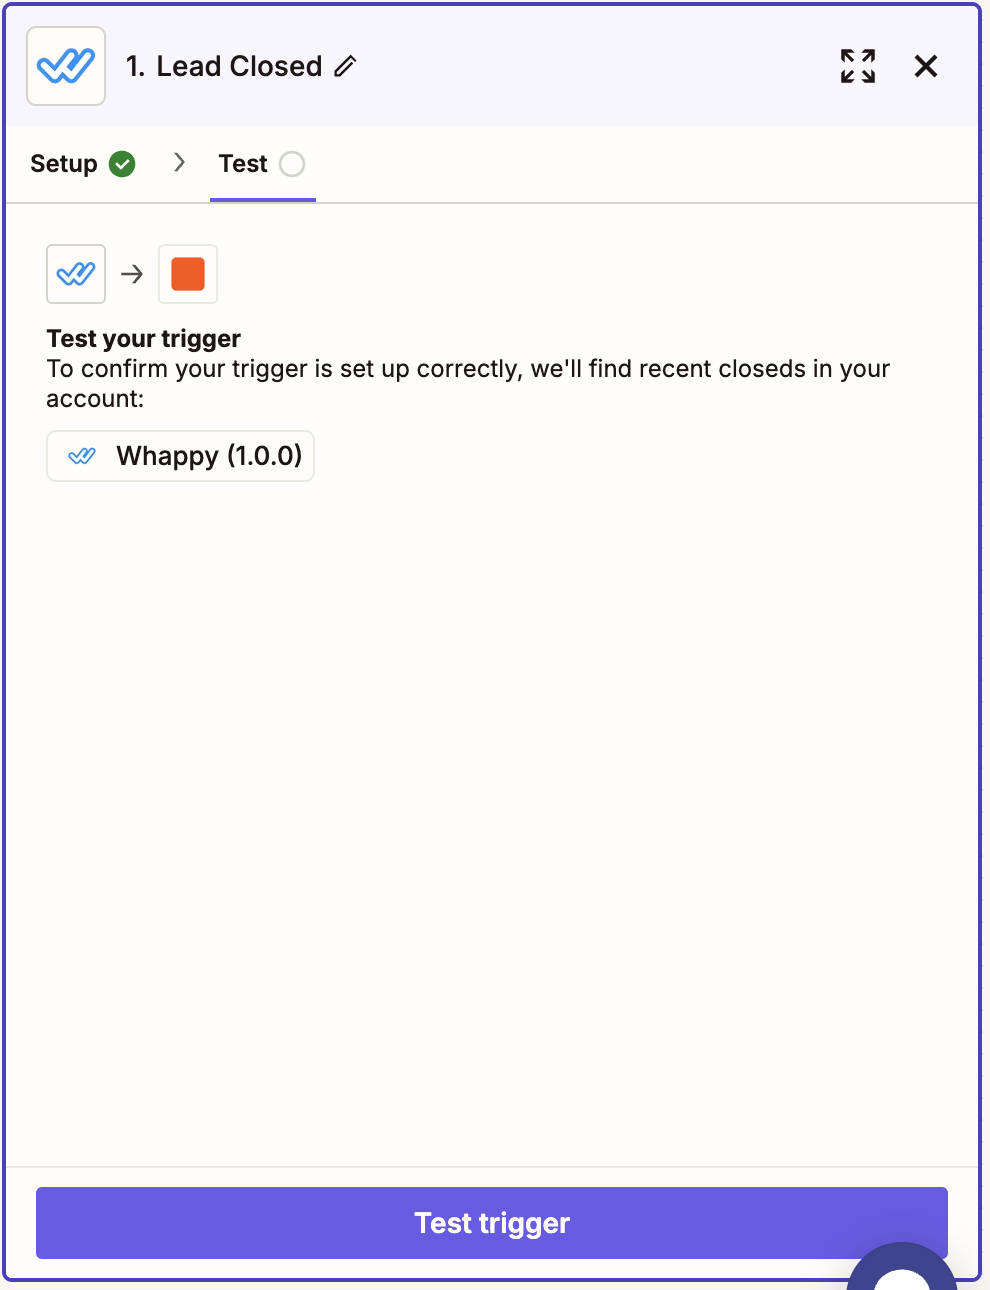
1. Click **Test trigger** to pull in sample data from Whappy
2. You'll see the lead data structure that will be sent to your next app
3. Review the sample data and click **Continue**
If no sample data appears, make sure you have at least one completed conversation or appointment in Whappy.
1. Choose the app you want to send data to (HubSpot, Google Calendar, Mailchimp, etc.)
2. Connect your account for the chosen app
3. Map the Whappy fields to your target app fields
4. Test the complete Zap
5. Turn on your Zap to start the automation
### Popular Trigger Use Cases
**Setup**:
* **Trigger**: Lead Closed
* **Action**: Create Contact in CRM
**Field Mapping Example**:
* Whappy "Name" → CRM "First Name" / "Last Name"
* Whappy "Phone" → CRM "Phone Number"
* Whappy "Email" → CRM "Email Address"
* Whappy "Collected Info" → CRM Custom Properties
**Benefits**: Automatically populate your CRM with qualified leads and their conversation data.
**Setup**:
* **Trigger**: Appointment Scheduled
* **Action**: Create Google Calendar Event
**Field Mapping Example**:
* Whappy "Appointment Date" → Calendar "Event Start Time"
* Whappy "Lead Name" → Calendar "Event Title"
* Whappy "Phone" → Calendar "Event Description"
**Benefits**: Automatically block time in your calendar when leads book appointments through WhatsApp.
**Setup**:
* **Trigger**: Lead Closed
* **Action**: Add Subscriber to Mailchimp/ConvertKit
**Field Mapping Example**:
* Whappy "Email" → Email Tool "Subscriber Email"
* Whappy "Name" → Email Tool "Subscriber Name"
* Whappy "Collected Info" → Email Tool Tags/Custom Fields
**Benefits**: Automatically nurture qualified leads with targeted email sequences.
***
## Managing Your API Key
Your Zapier API key is found in **Integrations → Zapier** in your Whappy dashboard. This same key works for both triggers and actions.
### API Key Security
* Don't share your API key publicly
* Only use it in trusted Zapier automations
* Contact support if you suspect it's compromised
* Check Zapier task history regularly
* Review new leads in Whappy dashboard
* Monitor for unexpected activity
***
## Troubleshooting
**Problem**: "Failed to connect to Whappy" error
**Solutions**:
* Double-check you copied the complete API key from Whappy
* Ensure no extra spaces before or after the key
* Try disconnecting and reconnecting your account in Zapier
* Verify you're using the correct API key from the Zapier integration card
**Problem**: No data being sent when leads complete conversations
**Solutions**:
* Verify your Zap is turned **ON** in Zapier
* Check that leads are actually reaching the close or appointment steps in your funnel
* Test with real conversations, not test mode data
* Review Zapier task history for error messages
* Ensure your campaign is running (not stopped)
**Problem**: "Failed to create lead" error
**Solutions**:
* Ensure phone number includes country code (+1234567890)
* Verify both Phone and First Name fields are properly mapped
* Check that the phone number format is valid for WhatsApp
* Try testing with just the required fields first
* Ensure the lead data is in proper JSON format if using custom fields
**Problem**: Leads created but missing information
**Solutions**:
* Check your field mapping in the Zapier action setup
* Ensure your source app is providing the expected data
* Test with static values before using dynamic data from triggers
* Verify JSON format for the Lead Data field
* Check if optional fields are actually being provided by the trigger
***
## Best Practices
### Getting Started
* **Start simple**: Begin with basic automations before adding complexity
* **Test thoroughly**: Always test with sample data before going live
* **Use test leads**: Mark leads as "test" during setup to avoid affecting real data
* **Monitor early**: Check your automations frequently in the first few days
### Workflow Optimization
* **Use filters**: Add Zapier filters to process only relevant leads (e.g., specific budgets, sources)
* **Separate Zaps**: Create different Zaps for different lead sources rather than complex multi-step workflows
* **Error handling**: Set up email notifications for failed Zapier tasks
* **Regular maintenance**: Review and update your Zaps monthly
### Data Quality
* **Validate phone numbers**: Ensure phone numbers include country codes and are properly formatted
* **Keep data consistent**: Use standardized formats for custom fields across all sources
* **Monitor lead quality**: Regularly review leads coming through automation vs. manual entry
Start with one simple automation (like sending closed leads to your CRM) before building complex multi-step workflows. This helps you understand the data flow and catch any issues early.
***
## Next Steps
Ready to automate your lead workflow?
1. **Get your API key**: Go to **Integrations → Zapier** in your Whappy dashboard
2. **Choose your first automation**: Start with either sending qualified leads to your CRM or receiving leads from your most active lead source
3. **Follow the setup guides**: Use the step-by-step instructions above
4. **Test and monitor**: Always test thoroughly before going live
Send qualified leads to your CRM automatically
Add form submissions to Whappy for WhatsApp follow-up
Choose the trigger that matches your workflow:
* **Lead Closed**: Use this to send completed/qualified leads to your CRM or email marketing tools
* **Appointment Scheduled**: Use this to create calendar events or send confirmation emails
1. Click **Sign in to Whappy**
2. In your Whappy dashboard, navigate to **Integrations → Zapier**
3. Copy your API key from the Zapier integration card
4. Return to Zapier and paste the API key in the connection form
5. Click **Yes, Continue to Whappy**
Click **Continue**.
Your API key is unique to your account. Keep it secure and don't share it publicly.
1. Click **Test trigger** to pull in sample data from Whappy
2. You'll see the lead data structure that will be sent to your next app
3. Review the sample data and click **Continue**
If no sample data appears, make sure you have at least one completed conversation or appointment in Whappy.
1. Choose the app you want to send data to (HubSpot, Google Calendar, Mailchimp, etc.)
2. Connect your account for the chosen app
3. Map the Whappy fields to your target app fields
4. Test the complete Zap
5. Turn on your Zap to start the automation
### Popular Trigger Use Cases
**Setup**:
* **Trigger**: Lead Closed
* **Action**: Create Contact in CRM
**Field Mapping Example**:
* Whappy "Name" → CRM "First Name" / "Last Name"
* Whappy "Phone" → CRM "Phone Number"
* Whappy "Email" → CRM "Email Address"
* Whappy "Collected Info" → CRM Custom Properties
**Benefits**: Automatically populate your CRM with qualified leads and their conversation data.
**Setup**:
* **Trigger**: Appointment Scheduled
* **Action**: Create Google Calendar Event
**Field Mapping Example**:
* Whappy "Appointment Date" → Calendar "Event Start Time"
* Whappy "Lead Name" → Calendar "Event Title"
* Whappy "Phone" → Calendar "Event Description"
**Benefits**: Automatically block time in your calendar when leads book appointments through WhatsApp.
**Setup**:
* **Trigger**: Lead Closed
* **Action**: Add Subscriber to Mailchimp/ConvertKit
**Field Mapping Example**:
* Whappy "Email" → Email Tool "Subscriber Email"
* Whappy "Name" → Email Tool "Subscriber Name"
* Whappy "Collected Info" → Email Tool Tags/Custom Fields
**Benefits**: Automatically nurture qualified leads with targeted email sequences.
***
## Managing Your API Key
Your Zapier API key is found in **Integrations → Zapier** in your Whappy dashboard. This same key works for both triggers and actions.
### API Key Security
* Don't share your API key publicly
* Only use it in trusted Zapier automations
* Contact support if you suspect it's compromised
* Check Zapier task history regularly
* Review new leads in Whappy dashboard
* Monitor for unexpected activity
***
## Troubleshooting
**Problem**: "Failed to connect to Whappy" error
**Solutions**:
* Double-check you copied the complete API key from Whappy
* Ensure no extra spaces before or after the key
* Try disconnecting and reconnecting your account in Zapier
* Verify you're using the correct API key from the Zapier integration card
**Problem**: No data being sent when leads complete conversations
**Solutions**:
* Verify your Zap is turned **ON** in Zapier
* Check that leads are actually reaching the close or appointment steps in your funnel
* Test with real conversations, not test mode data
* Review Zapier task history for error messages
* Ensure your campaign is running (not stopped)
**Problem**: "Failed to create lead" error
**Solutions**:
* Ensure phone number includes country code (+1234567890)
* Verify both Phone and First Name fields are properly mapped
* Check that the phone number format is valid for WhatsApp
* Try testing with just the required fields first
* Ensure the lead data is in proper JSON format if using custom fields
**Problem**: Leads created but missing information
**Solutions**:
* Check your field mapping in the Zapier action setup
* Ensure your source app is providing the expected data
* Test with static values before using dynamic data from triggers
* Verify JSON format for the Lead Data field
* Check if optional fields are actually being provided by the trigger
***
## Best Practices
### Getting Started
* **Start simple**: Begin with basic automations before adding complexity
* **Test thoroughly**: Always test with sample data before going live
* **Use test leads**: Mark leads as "test" during setup to avoid affecting real data
* **Monitor early**: Check your automations frequently in the first few days
### Workflow Optimization
* **Use filters**: Add Zapier filters to process only relevant leads (e.g., specific budgets, sources)
* **Separate Zaps**: Create different Zaps for different lead sources rather than complex multi-step workflows
* **Error handling**: Set up email notifications for failed Zapier tasks
* **Regular maintenance**: Review and update your Zaps monthly
### Data Quality
* **Validate phone numbers**: Ensure phone numbers include country codes and are properly formatted
* **Keep data consistent**: Use standardized formats for custom fields across all sources
* **Monitor lead quality**: Regularly review leads coming through automation vs. manual entry
Start with one simple automation (like sending closed leads to your CRM) before building complex multi-step workflows. This helps you understand the data flow and catch any issues early.
***
## Next Steps
Ready to automate your lead workflow?
1. **Get your API key**: Go to **Integrations → Zapier** in your Whappy dashboard
2. **Choose your first automation**: Start with either sending qualified leads to your CRM or receiving leads from your most active lead source
3. **Follow the setup guides**: Use the step-by-step instructions above
4. **Test and monitor**: Always test thoroughly before going live
Send qualified leads to your CRM automatically
Add form submissions to Whappy for WhatsApp follow-up